Aluminum Fence Installation

Aluminum fence installation is easier than you might expect. At GreatFence.com, we specialize in rust-free, USA-made aluminum fence panels and gates designed specifically for DIY installation. Whether you’re handling a full aluminum fence installation or simply installing an aluminum gate, our American-made system ensures you can get the job done with basic tools. This guide covers how to install aluminum fence posts, panels, and entry gates without hiring a contractor — saving time and money.

Do It Yourself Installation (Save on Labor Costs)

Aluminum Fence & Gate - do it yourself installation

Aluminum Fence & Gate Installation FAQs

Yes. All GreatFence.com aluminum fencing products are designed for do-it-yourself installation. No welding is required, and everything ships pre-fabricated with simple connection points.
No. Gate posts must be purchased separately and are available in the Aluminum Posts section. A total of two posts are required per gate — whether it’s a single or double configuration.
No. Aluminum gates from GreatFence.com are fully welded and cannot be trimmed or resized. Please measure carefully before ordering.
It’s up to you. Some customers prefer to start with their gate installation and build outward with fence panels, while others start with their first end post and fence panel Either method works.
Posts are routed — not punched — and customized for each order based on post type (line, end, corner), panel style, height, and number of rails. Gate Posts are not pre-drilled for standard gate hinges, TRUClose hinges or any of our gate locks. These items are easily installed on-site. For larger gates, our Adjustable heavy Duty Gate Hinges include a hinge block which is factory-welded onto your chosen gate. See: Heavy Duty Gate Hinge Specification sheet (pdf).
Minimum 2 feet, 3 - 3 1/2 feet for jurisdictions with frost-lines. Always check your local building codes. Checking your local codes is easy with a simple Google search.
Check your local building codes for information on this. If you can't find specific requirements, then you'll have to do some "trial and error" work based upon the depth and diameter of the hole you make for each post.
No. All gate widths (single gates and double gates) include the spacing for the hinges and lock. For more information, see: Aluminum Gate Widths
Styles 1, 2, 3, 4, 9 and 10 have standard spacing.  Styles 7 & 8 have close spacing. See:  aluminum Fence shop drawings and aluminum fence specifications
If you ordered an unassembled fence panel, please review the applicable shop drawing prior to assembly.
Note: vertical pickets go through the horizontal rails.
View Shop Drawings

Before You Begin: Read This First

Successful aluminum fence installation starts with proper planning. Before you set your first post, take a few minutes to review the critical setup steps that will ensure smooth DIY installation. Many of our customers install their entire fencing system in a weekend — but it’s essential to start with accurate measurements, the right post types, and awareness of any underground utilities.

  • Measure your yard or project space accurately

  • Choose between line, end, corner, blank, or gate posts

  • Download the Installation Manual (PDF)

  • Plan gate openings and determine if surface mounting is required

  • Check with your local HOA and/or your local building codes

  • Do not dig all your holes in advance; install posts as you build your barrier

Required Posts and Mounting Options

Every aluminum fence installation starts with choosing the correct posts. GreatFence.com offers five types of posts — line, end, corner, gate, and blank — each engineered for specific points in your layout. Whether you’re installing an aluminum fence around your yard, pool, or driveway, selecting the right post type ensures a strong, secure fit and smooth panel connections.

white, routed aluminum fence posts
  • Line Posts – Used between panels in a straight run

  • End Posts – Terminate a run or end a fence line

  • Corner Posts – Used at 90-degree corners

  • Gate Posts – Heavier wall thickness to support gates

  • Blank Posts – No punched holes; used for making hard angles or connecting heavy rackable fence panels, mounts sold separately (see:  Aluminum Fence Accessories.

Aluminum Post Routing Diagrams - greatfence

Aluminum fence and gate installation is easy with greatfence.com fencing because our products have been designed with home owners and business owners in mind. Spend no money on costly installation fees. Let greatfence.com help you on your next DIY project. Browse through our aluminum fence and gate installation page to find instructions and other useful tips that can help you set up our aluminum fencing products.

Do-it-Yourself Made Easy

We believe that pre- and post-installation are just as important as the installation process itself.  Read our installation manual to have an idea about the tools you’ll need for your project. From string or chalk line and stakes to bungee cords, we list everything you need to prepare.

Save Money!

No need to hire someone if you can do the process yourself. Save money on installation by ordering from greatfence.com. Call us at 888-379-1312 if you still can’t find what you’re looking for. Our customer support and corporate and sales team will be glad to help.

Line post connection to a residential aluminum fence panel

Insert, Set and Forget!

Set your panel-to-post connection with self tapping screws included with your order!

Need Post Spacing Measurements?

Use our full On-Center Spacing Chart to verify post-to-post measurements by grade and panel width before digging or setting any posts.

We’ve made it easy to order 100% online.
Every aluminum fence panel, post and gate is custom-built and can be quoted or purchased directly on this site.
Need help? Call us — or email us anytime.

ALUMINUM POST CONFIGURATIONS:

  • Cemented in Ground – For grass or dirt surfaces

  • Surface Mounted (Welded Plate) – For concrete or hardscape

  • Surface Mounted with Cover Plate – Decorative option to hide bolts and fasteners

Always check your local building codes when it comes to your posts.  This is not difficult.  Ask your HOA or search for your city/town + building codes.

aluminum post installation options

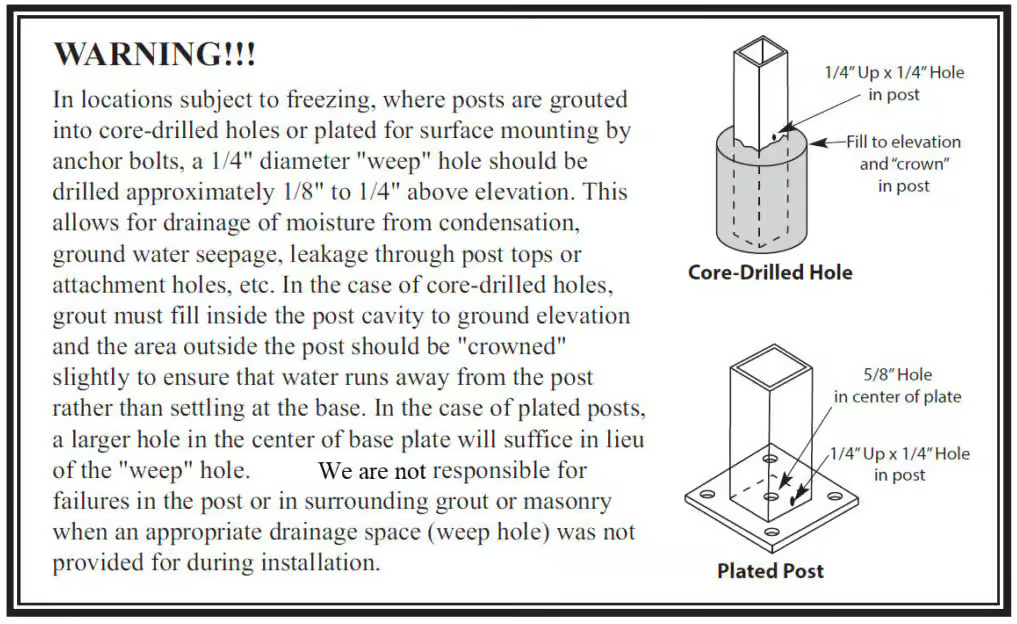
Cementing your posts in ground, most US jurisdictions require a minimum of 2 feet below surface level; 3 feet if you have a frost-line issue.  Always check your local building codes.  Welded Plates require your Posts to be 3 INCHES longer than the height of your fence panel or gate.  Cement and/or anchors are not included with your purchase; purchase locally.  If your specific application requires both types, Cemented In Ground and Welded Plate Posts, always start your installation with the products using the welded plate posts as this will “set” the template for your entire barrier.  And, welded plate posts have no vertical adjustment flexibility on-site; whereas posts Cemented In Ground do.

aluminum fence post installation weep hole warning
Plate Cover installation

STEP-BY-STEP ALUMINUM FENCE INSTALLATION:

Installing an aluminum fence is a straightforward process with GreatFence.com’s pre-punched posts and easy-to-install fence panels. You won’t need welding or specialty tools. This step-by-step guide outlines the key stages for a smooth DIY aluminum fence install.

GreatFence.com aluminum fence systems use custom-routed posts — not pre-punched ones. Each line, end, and corner post is routed based on its function, your chosen fence style, height, and number of horizontal rails. Fence panels attach to these routed posts by inserting the horizontal rails directly into the routed holes on the posts.  Then, you set the panel-to-post connection by self tapping stainless steel screws (with powder coated screw-heads) through the post and into the rail.  

Unlike lower-grade systems where you set all posts first, our installation process works best when you build your fence section by section. Once your first panel is installed, it becomes your visual guide for the rest of the fence line — greatly reducing guesswork.

A man installing a black aluminum gate
Exclusive to GreatFence®

Aluminum Fence Panel On-Center Spacing Calculator

Pick your GradePanel WidthPost Size. We’ll auto-fill the post-to-post “On Center” spacing measurement. This measurement is a combination of 1 aluminum fence panel connected to 2 (line, corner, end) posts which helps in determining how many sections you will need to purchase. We recommend rounding up your fence panel quantities for each fence run so that you have enough product to complete your barrier.

On-Center Measurement
This shows the typical center-to-center spacing for your selection.

Note: This calculator is just a guide and only applies to greatfence.com aluminum fence panels (not gates) connecting to our factory-routed line, corner, end and/or 3-way posts (not blank posts). Additionally, all fence panel widths (not gates) can be easily trimmed on-site -- diy installation. On Center spacing measurenet adjustments are needed when racking panels to accommodate different slope conditions — whether slight, medium, or steep. SAVE ON LABOR COSTS AND INSTALL YOURSELF!

ALUMINUM GATE INSTALLATION:

GreatFence.com aluminum gates are fully welded, made to order, and delivered ready for installation — with no cutting or on-site modification required. Unlike our aluminum fence panels, gates cannot be trimmed. Gate width includes the necessary spacing for both hinges and the gate lock, so the total width refers to the clear opening between gate posts — not the actual leaf size.

Gate posts are not included with the gate purchase and must be ordered separately. You can select the correct posts from our Aluminum Posts section. Both single and double gate installations require two gate posts total — one on each side.  Double Gates do not require a post in the middle.

Some customers begin their project by installing the gate first and then working outward with fence panels. This method can simplify alignment and spacing, especially in driveways or narrow access areas.

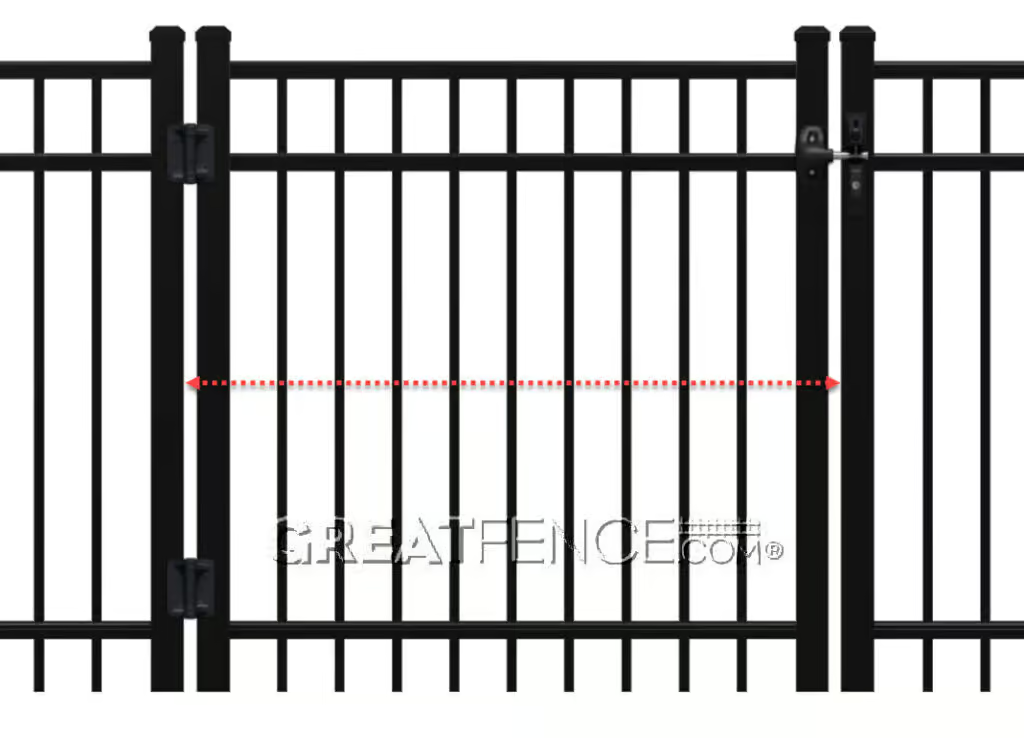
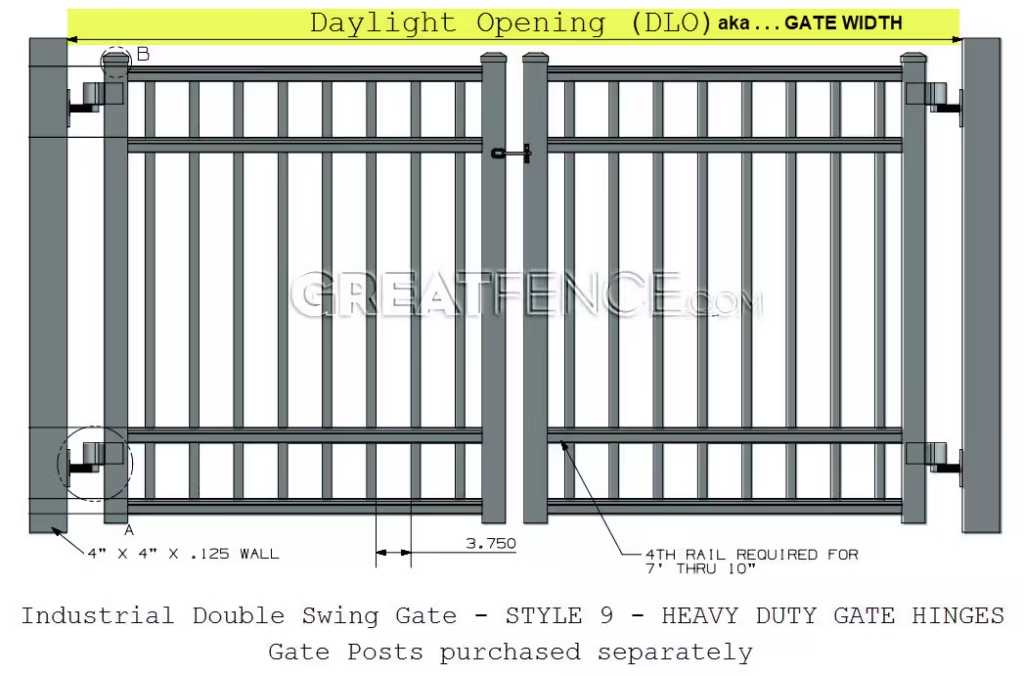
  • Gates are non-trimmable — all widths are set at the factory

  • Gate width = opening + hinge and lock spacing

  • Order gate posts separately — they are not bundled with your gate purchase

  • Both single and double gates require 2 gate posts total

  • Install gates before fencing, if preferred, to anchor alignment

  • Standard and Truclose hinges allow you to decide the swing trajectory on-site

  • Use our Adjustable Heavy Duty Gate Hinges for single gates 7 feet wide and wider and double gates 14 feet wide and wider

  • We also offer Steel Gate Posts which are required for single gates 9 feet wide and wider and for double gates 18 feet wide and wider.

All Gate Widths include the spacing for the hinges and the spacing for the gate lock.

Reminder: All gates include the required spacing for your selected hinge and lock hardware. Do not adjust the opening width — we’ve done the math for you.

illustrating a gate width on an aluminum single gate
aluminum double gate - gate width

NOTE:  Heavy Duty Gate Hinges require 4″ x 4″ Gate Posts or larger.
Heavy Duty Gate Hinges will not work with smaller posts.

Exploded view of adjustable Heavy Duty Gate Hinge with multiple components

DIY Made Easy for Wider Gates

Installing a larger gate yourself? Our adjustable Heavy Duty Gate Hinges make it possible. Designed for Aluminum Single Gates (7–15 ft. wide) and Double Swing Driveway Gates (14–30 ft. wide), these hinges ensure smooth, balanced operation without sagging — even for big openings. Perfect for DIY installers who want professional results without hiring a contractor.

📥 Download the Heavy Duty Hinge PDF
Save Your Cart
Share Your Cart