How to Plan Your Aluminum Fence Layout Without Overbuying
📏 Step 1: Measure Your Perimeter Precisely
Before you start shopping for fence panels or posts, walk the entire area you want to enclose. Use a measuring wheel or long tape measure, and mark corner points using stakes or spray paint.
Take measurements in feet and inches
Include slopes, curves, or columns in your notes
Avoid assuming property lines — check your plat map or survey
📐 Step 2: Sketch Out Your Layout
Draw a simple bird’s-eye view of your fence perimeter. Mark:
All corners
Any gates
Where the fence should start and stop
Obstacles (trees, columns, driveways)
Even a hand-drawn sketch will help you visualize your fence and prepare for panel spacing and gate placement.
🚪 Step 3: Choose Gate Locations Strategically
Gate placement can make or break your fence layout. Ask yourself:
Where do people and vehicles need access?
Do I need a walk gate, driveway gate, or both?
Do I want my gates centered or aligned with a path/drive?
Remember: Gate widths are opening sizes between posts, so plan accordingly.
📏 Step 4: Know Your Panel Widths & Post Spacing
GreatFence.com offers residential fence panels in 6-foot or 7-foot widths, depending on style. These panels cannot be stacked or doubled, so your layout must account for:
Trim-to-fit panels at the end of a run
Posts needed at every panel junction and corner
Optional use of rail mounts for walls or columns
Use your sketch to count the number of full panels, trimmed panels, and posts.
📦 Step 5: Order the Right Quantity — No More, No Less
Now that you’ve mapped it out, you can confidently calculate how many:
Fence panels you need
Posts (line, corner, end, gate posts)
Gates (and matching hardware)
Want to skip the math? Upload your sketch using our quote request form and let our team do the rest.
🛠 Bonus Tip: Don't Forget Accessories
Planning your layout also means accounting for:
Self-closing hinges or latches for pool codes
Wall mounts for attaching to columns
Heavy-duty hardware for driveway gates
Each layout is unique — and GreatFence.com custom-builds every order to your specs.
💡 Final Thoughts
By planning your aluminum fence layout carefully, you’ll avoid overbuying, minimize waste, and save big on your next project. Whether you’re going DIY or hiring a pro, a smart layout is the first step to a flawless fence install.
Need help? Request a quote today — just upload your sketch and we’ll take care of the rest.
Use a measuring wheel or tape to walk your full perimeter. Mark each corner, gate location, and any obstacles. Then sketch it out to plan panel spacing and post placement.
You’ll need a post at every panel connection, plus gate posts at each gate. Rail mounts may reduce the need for posts when attaching to walls or columns.
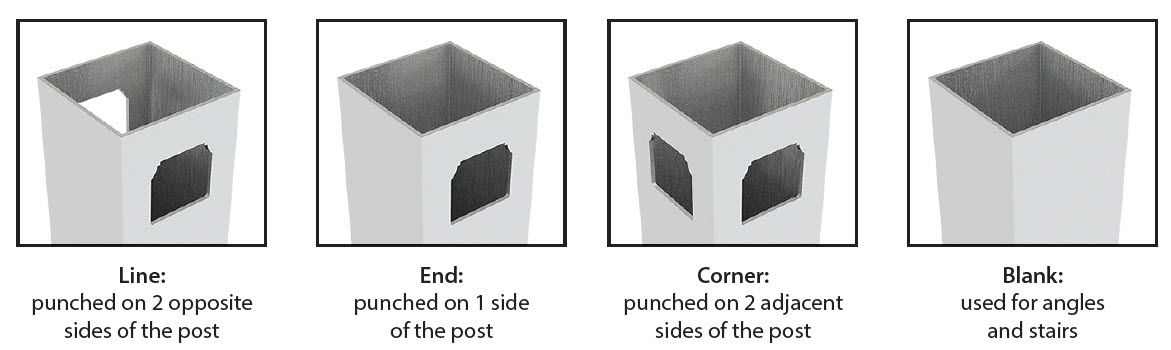
aluminum post punches
Yes. GreatFence.com products are designed for easy DIY installation. Just follow your layout sketch, dig and set posts, and mount the panels using our included instructions. Do not dig all of your posts in advance; instead, build your barrier one section at a time.
learn more
First, you have to decide which fence panel widths you will be ordering. Residential Fence Panels come in 5ft., 6ft., and 7 ft. widths with 6ft being the most popular width. Commercial and Industrial fence panels come in 6ft and 8 ft. widths. Let's say you're going to use 6 ft. wide fence panels. When measuring your layout, look at each fence run in 6ft. spans. Then, use the following guide to determine the quantities of each fence panel configuration:
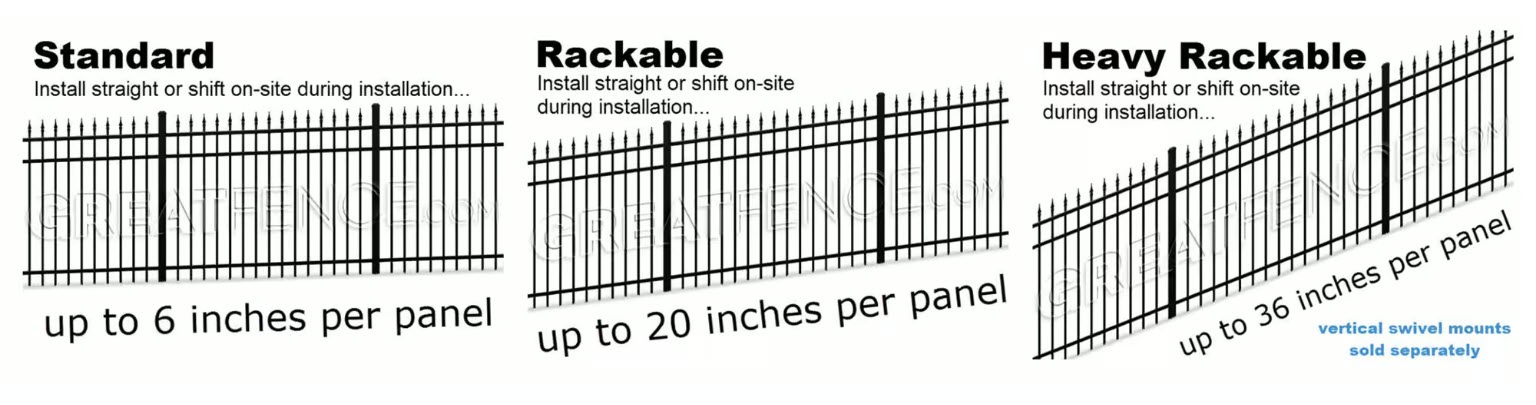
Racking Fence Panels by GreatFence.com
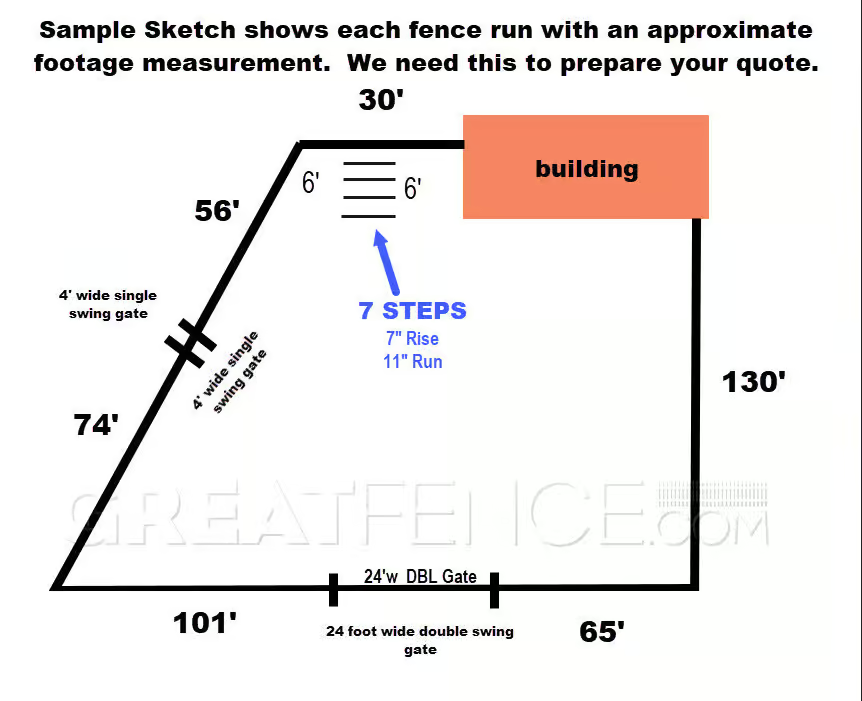
USE WHITE PAPER ONLY (no graph paper, no pictures, no city plots, no construction blueprints).
Clearly draw all fence lines (BIRDS-EYE-VIEW) so that we can see where your fence turns (corners) and where it starts or stops (ends).
Label each and every fence line with total length (in feet)
Point and notate to each specific spot any each run where you want any matching swing gates (single or double) and make sure you also notate the gate width for each gate.
Do not draw dots, do not draw posts, do not draw dividers for each fence panel. Do not send us city plot layouts or construction drawings.
Do Draw a square and label it house or building to represent any existing structure. If applicable, draw a small box with the Letter "C" to represent any existing columns.